Halloween is over and I'm still a little disappointed with the way things went this year. Because of commitments outside of the Haunt stuff I didn't get as much time to do props as I'd planned. Then I had sinus surgery the week before, so a lot of the little things I was planning on didn't happen either. so while overall, the outside was a lot like last year and the inside was improved a little, there is so much that is "in-progress" or not even started.
Lighting is a big problem, both inside and out. We had a little more light outside, but not enough. Inside, there was too much light I think. I want to change that up for next year, bringing the stringed lights to the floor, rather than the overhead. That should create just enough light to place your feet, and do some up-lighting creating shadows. I also want to use spot lights, so people can only see what I want them to see.
I have a few of the projects to hand and I want to keep working on them now. Tonight I'll work on the dream catchers, which I have the hoops here, the cord to do it. I'll have to locate feathers and beads to dress them, but I think I can finish those tonight.
I also have a stack of books in the living room that are ready for titles to be placed on them. I will try to work on those next. I also intend to work some SCA projects through out the year along side the Haunt stuff, so there won't be so much crunch time issues.
Saturday, November 5, 2011
Friday, September 23, 2011
catching up to Halloween
I have been thoroughly distracted by my SCA commitments for the last several months. Even last month when I should have been prop building I was off playing with enameling for a dear friend's elevation. That elevation is tomorrow, so I'm looking at Sunday to be the real start of my prop building season. I have had to make some adjustments, because of time and money. The new gravestones will mostly not happen this year, though I have come up with an alternative, recycled so therefore a free, material, that might make a couple possible. And other things are always being reviewed and repurposed all the time. Such as the pvc pipe tube and scraps that I'd made a bow case out of years ago, that I no longer have the bow for. Those pieces will be cut up for candles, and there's plenty of pipe, so I won't need to purchase any of that. There's also a smaller diameter pvc pipe from a camp shower that I'd made years ago and I don't think I've ever used, that will go to the portable hole attachment for the tombstones as well as the frame for the spider victim and the ghoul on one of the new stones. I should be able to make a charger plate worth of taper candles with a set of flicker lights. I've been picking up the flicker tea lights all summer as I've had coupons and was at hobby lobby for other things so I have a fairly decent stash now.
I know that I need the lanterns for the walkway from the street. I have the clay and designs for that project. I was also considering what else is stashed in the garage and I seem to recall a box of landscaping lights that have never been installed. I believe they are electrical, and I don't recall much else about them, except that I'd bought them on clearance, when I'd lived in another house, something like 12 years ago. It's past time to get them out and use them. I am hoping that I will be able to make a lantern that just slips over the existing light and I'm done. That would mean I could use my lanterns in other places and ways at other times.
So many projects I have just waiting for me to get time to sit down and work on them. I have my calendar marked, it's 38 days to Halloween, and one week before I wanted to start putting things out. My thought is to start with things close to the house and work my way out through the yard, building up to Halloween. Then on the last day I don't have to do as much set up. That's the theory anyway.
Saturday, June 25, 2011
regarding the last post
Sucks that for some reason that the link I had carefully typed in because it wouldn't copy/paste, is gone in the final post. so, for those might be what to know what I'm going on about, it's from the Bradford Exchange, called the Bastion of Fire. Ccool dragon coiled around a candle stick with a huge faceted gem on the top with a candle flame
Futures Projects
This little gem showed up in someone's mail today. I really like the piece, except it is only 8 inches tall and $30 plus shipping and handling. It does beg to be a future project though. I could see taking say, an old floor lamp, create a dragon wrapping around pole, the large crystal at the top with a place for the candle/flickering bulb might be tricky, but it could be done with maybe a ring of crystals maybe? The flyer is getting tucked into the haunt book and I'll have to see what I can come up with. I can't put this on the list for this year, unless I can figure out how to pull it off with only a day or two of work, and minimal cost.
In other works, I finished the Weyward sisters' painting. Although I'd originally planned to make it an oil painting, it didn't happen that way. I'd had the sketch on the canvas for several months and I decided I was procrastinating on the painting because I'm not super comfortable with the oils yet. I switched to acrylics and it came together in a couple of evenings. I'm quite pleased with it. It also encouraged me to look at the paints and toss out a number that were no longer viable, for one reason or another. That box is now half empty. I might look over the box and see if there are any basics I don't have, but i think I have the primaries so I'm covered. I do want to make more of my paintings with mixing my own colors, whether oil, acrylic or gouache.
I has a great time at the thrift store today, purchasing bottles of various sizes for potions, witches ingredients, and other strange specimens. Also as I went by the curtains and such section, it occurred to me that some of the old lace style curtains would work just fine for a ghost or two, and a panel that is 60" wide and 84" long, that's 2 and a thirds yard for 1.99, is a much better deal that most sources for cheese (or mummy) cloth. I also found some inexpensive, thin white cloth, about 8 yards for 6-7 dollars. that will also work for ghosts.
Let's see, what else have I been doing... last week was bunches of snakes and other other creatures for the specimens last week. A couple of inexpensive divination cards, so there's no worry if someone decides to keep a souvenir. I also have the materials to do the mosaic on the bookshelf, which is sitting in the hall waiting to be pulled out of the box and put together. I really need some time away from other things (like work and SCA) to work some projects. Muffie is still in the kitchen in pieces. I need to do another layer or two of papier mache on her feet and arms, maybe her head too, before I assemble her body. I have a wig and her dress on hand, so those things are ready to go together.
So, that's where I've been lately, thinking I need to pick up a large tub for fabric storage for the Haunt. I have at least two or three pieces for it already.
OH YEAH, I did have a major windfall last week regarding the Haunt. I'd asked a gardening friend if she could collect some plant materials for me, to hang as herbs. I told her it didn't matter if they were actual herbs, just something with character that I can label and hang. I also suggested any cool roots or branches that would make wands would be welcomed. I got a couple of things, one was a large trash bag full of black plastic tablecloths. Another was a bag of felt scraps, black, red and maybe some other colors. and there was a number of glass domes which will be great for specimens. But the best part of it all was a paperbox lid full of premade wands, complete with tags. there were a couple of bunches of wands, with tags of the wood used and others without. All of those were prepped for wand making. That means that I can mark wands off my list. I certainly don't need to make more!! Thanks Debora and Lizz for the gift.
Wednesday, June 1, 2011
Chip and Muffie
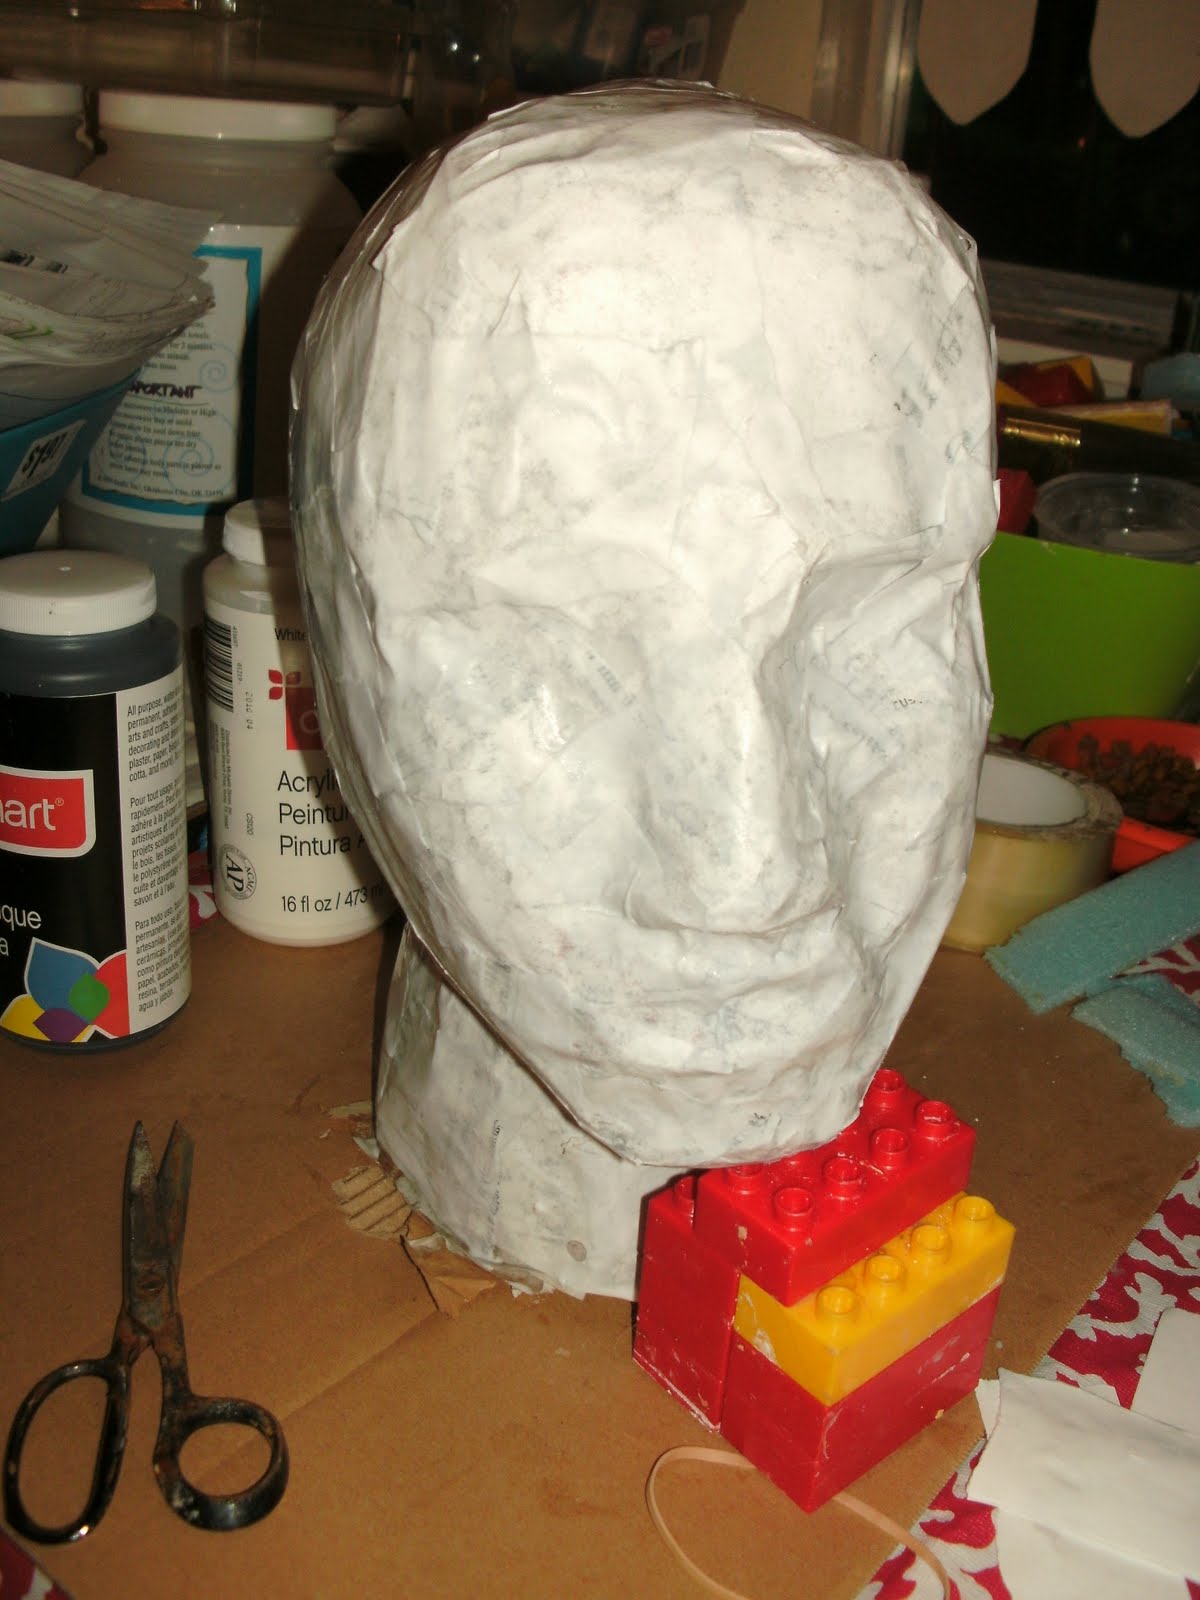


So here they are, Muffie and Chip. Chip's the one with the lego chin rest. There was so much clay used to build up his face on the wig head that it tends to tip over at the slightest touch. Given that the cats like to wander through the work table here I leave the chin rest in place during the day, and especially when I'm working on him.
This is the third layer of paper on them, still sticky wet. The first two layers of paper were newspaper, this was office paper, scrounged from the daily grind. I just made sure it went on with the white side out so I could try to get a feel for how much detail I've losted. Their upper lips seems to be gone and the deep lines I'd gotten in there to show an expression seems to be gone too. Still, enough detail remains for this project.
Tomorrow when they are dry I'll be cutting them off the wig heads and begin the shoulders for Muffie, hands for them both and maybe feet for Muffie too, depends on how late I have to work tomorrow. Tonight my energy was gone pretty early.
Zombies are coming!
The plan is coming together for my zombies. Oh, yes, a deviation from the plan.
Instead of your run of the mill zombie hanging out in the front yard, I decided my guy needed a friend and I have the bits to put together a girl, and so I have this couple, that I decided to make homecoming king and queen zombies. Their names are Chip and Muffie. I have started with their heads. I took wig heads and some modeling clay to first make the head more proportional to a real human head, then there was some expression added. Next step was to cover in plastic wrap and then papier-mâché. I have the second layer drying right now. Tonight I plan to add a third layer. Tomorrow when that third layer is dried, I'll be cutting the heads off the wig heads. I expect to seal up that cut as I attach to the main frame of the zombies.
Muffie is going to be a lot more papier-mâché work that ole Chip, since her dress is a wide open neckline and short sleeves. While Chip's limbs will be mostly constructed from the heavy cardboard tubes from industrial paper rolls (about 3 1/2" in diameter) Muffie's lower legs and arms are going to be a base of dowel rods inserted into pool noodles, then covered in papier-mâché. The tubes are just too large to pass as a female's limbs - well, a teenage one that isn't oversized anyway. Since I expected the lower portion of her dress to be in tatters and nosey neighbor kids, I'll be making from the knee down a shaped leg, complete with feet that will fit into a pair of cast off shoes.
My next papier-mâché endeavor will be their hands, and her limbs and shoulders.
I have a complex form laid out for Chip's frame, using the tubes and spacers to get the width desired. I have also been working on how to make the arms adjustable. My preference is to make them adjustable, since I see them raised, reaching out for their victims. But storing them like that could be problematic, so I want to be able to lower the arms. And maybe standing there with their arms hanging, perhaps moving with the wind would be cool too. I'd like to keep the options open as much as possible.
I have an old formal that has been used for various occasions, dress, etc and is ready to move on to its new role as Muffie's prom dress. It's going to be needing some distressing, that I hope I'll be done with mostly by the time her body is ready . I have a prop wig for her, but will need one for him, and I will be looking for a tiara for her and one of those big purple velvet lined crowns for him, as well as sashes for both.
Their last item on the list is their ability to call out for brains when someone walks by. I have a Billy Bass plaque that I'll be working on to rework it to play mp3s, since it already has the motion sensor and ability to play something, so it should be a piece of cake, right?
Tomorrow I will take pictures before I cut the papier-mâché off the wig heads. I meant to take one of the modeled faces, but forgot, so I'm hoping the faces underneath won't be distorted by all this.
Sunday, April 17, 2011
Progess, small but steady
I'm still collecting bottles and things for the potion shelf. I also picked up some black craft foam to make bat wings. I'm a little distracted from these projects by the local SCA event that is in two weeks. still have lots of the costume to do and keep coming up with more stuff.... Which is what I do here too I guess, because there are a lot of things on the list and even if I manage to get something done, two more things take it's place. well, for now that is all alex
Tuesday, March 22, 2011
The list
Here are the projects that I want to do for the Haunt, with the steps that are needed. Some things aren't as fully defined as others, some are more detailed. It all depends on what has hooked my interest at an available moment.
- Driveway gate
- Two posts for either side, with notches that caution tape can be caught on
- Sign
- "DO NOT ENTER" sign for driveway gate
- DRAGON Lights
- Redo the smoke around the dragon head, insert lights- see the glowing coals prop
- Gargoyle
- Purchase paper clay
- Build wooden boxes that will allow the gargoyle base to slip onto it (the new pedestal) –add moldings and finish with paint/sealant
- Work clay over surface of gargoyle, adding details as desired and smoothing out paper lines.
- Let dry
- Add paint/sealant
- Gravestones
- Existing gravestones – add dowels or stakes
- Create new stones& garden angel – purchase material
- Design
- Cut out
- Construct
- Age/finish
- 'store' items ~amulets and other mystic jewelry
- Cast in pewter, make from fimo
- 'store' items ~voo-doo dolls
- Dress the dolls I have
- Make more dolls
- Make a string that they can hang from
- Special pin cushions
- 'store' items ~Wands
- Make more wands
- 'store' items ~Potions
- Purchase various colored bottles, fill and seal - wax, cloth tied with string and cork
- label
- 'store' items ~Ingredients - jars filled with the following from macbeth:
- Eye of newt
- Poisoned entails
- toad venom
- fillet of a fenny snake
- toe of frog
- wool of bat
- tongue of dog
- adder's fork
- blind worm's sting
- lizards leg
- owlet's wing
- scale of dragon
- tooth of wolf
- witches' mummy
- maw & gulf of shark
- root of hemlock
- liver of blaspheming Jew
- gall of goat
- slips of yew (cut under the light of the moon)
- nose of Turk
- Tartar's lips
- finger of infant (illegitimate, strangled at birth)
- Tiger's chaudron
- baboon's blood.
- 'store' items ~Tags
- Price tags, "first born"," soul" etc.
- 'store' items ~spellbooks
- Glue string to spine of old text books to mimic the binding of all books
- Spray paint the edge of the pages gold
- Cut vinyl to size for each book
- Mark /trace title placement on the vinyl
- Fill in with gesso
- Go over with gold paint
- Use spray adhesive to glue vinyl to text book
- Use small pieces of craft metal to bend around the corners to hold the vinyl in place
- Creature manual ~ this one will be hand done with papers hand illuminated and calligraphy. Will also need special binding to match the others.
- Halloween costume
- Finish pants
- Make shoes, decorate
- Work on face make-up
- Consider gloves that have a design painted on (including the nails?)
- Make the large jewel for the turban wrapped balzo
- Halloween decorations on the walls inside and out
- Wall hangings – celtic knotwork/maze
- Weyward sisters painting- paint.
- Lanterns at the walkway
- Need set of larger lanterns to hang from Sheppard's hooks
- ZOMBIE
- Collect tubes for limbs
- Purchase dowels for hip and shoulder joints
- Drill through tubes for shoulders & insert dowel.
- Drill through tubes for hips and insert dowel
- Trim leg tubes to get raised leg/bent knee position
- Trim leg tubes of other leg to match the first leg (work for overall height of no more than 6 feet.)Purchase Styrofoam headCarve Styrofoam neck to fit into tube/glue as required to secure
- Carve eyes out of head and open up mouth
- Add layers of latex for skin
- Make eyeballs and teeth (put an eye ball on a string so it can pop out?
- )Carve hands stryrofoam, with "arm bones" to insert into tubes.
- Add layer of latex to hands to create skin look
- Add a short dowel to pair of old boots/shoes, insert lower legs to this (dowels go inside the tube) and fill with plaster {Cut a board 18 inch square for base{Drill holes at approx leg placement for dowel rods.{Glue dowel rods into holes
- Attach hands, glue as required.
- Create internal organs (old panty hose/ sausage casings? For intestines) Create skin lesions/cuts/wounds on face, hands and body
- Color skin as required
- Dress the zombie in old clothing
- Install voice box, movement, etc and sensor (see Eric for assist)Dirty the clothes, with red/dried stains
- Slash the clothing and into the body so organs spill out as desired.{Paint/seal base{Finish with leaves, etc to hide wood base
- Potion shelf
- Purchase tall bookshelf
- Exchange bottom two shelves for 18 – 20 inch wide shelves.
- Add dowels as front legs
- Add ball feet/Add material that can be carved to the front ball feet (like claws) ** add material to the front dowels to make them look like gargoyle legs/arms,
- paint the rest of the book shelf like it's a gargoyle (or other creature) with its mouth wide open to hold the potions and ingredients.
- Shelves could be tongue, rows of teeth, etc.
- Eyes and ears can be added to the top and sides
- SIGN
- Weyward Sisters' Emporium, bringing conflict, chaos and darkness to the world for centuries, as featured in W. Shakespeare's "Macbeth"
- Include the wavy star as the symbol in the center of the sign.
- Same stryrofoam as the new gravestones?
- Spider
- Cover partial inflated beach ball & balloons with papier-mâché for body.
- Build legs from pvc pipes.
- Spider egg sack
- Cover balloon with cheese cloth/paste
- remove balloon
- insert lights
- cover with small black spiders
- Include cords to hang or otherwise attach
- Spider victim
- Cut foam core board into torso shape
- Cut a pvc pipe from neck to foot height for 5ft person.
- Attach pvc to center of torso shape with tape and glue
- Add stryrofoam head to top of pvc pipe and glue Stuff a couple pairs of panty hose for the legs and arms with polyfil (can make stryrofoam hands and feet)Pad body with polyfil and old pillow fillings
- Wrap a layer or two of batting over al
- Walkway lanterns With Sheppard hooks
- Decide on designs
- Decide on air dry clay or pottery clay
- Roll clay into slabs and form structures
- Add a top
- Cut out designs for light to get out
- Dry
- (fire)
- Glaze-fire/ paint / seal
- Weeping willow tree one for graveyard, second for end of walkway
- Purchase wire, insulation tubes, duct tape, fabric, etc.
- Make a square (or odd shape base) out of wood. Include center post for tree to be built on and holes in the "corners" so that the base can be staked down.
- Build up trunk from the branches that peel off to get the drapey, weepy willow effect.
- Tape the truck to hold it together, and branches as required.
- Cover the truck with a cloth tube (either cami fabric or something that is painted to look like bark)
- Cover the base with paint to look like ground materials/add leaves, etc
Monday, March 21, 2011
Zombie plans
One of my new things for the Haunt this year is a zombie. I had originally had planned a mummie, but it seems that mummies are old fashion and zombies are in. First step was to collect paper roll tubes to create the skeleton. The tubes are about four inch in diameter and most of the tubes are 24" long and a couple are 36" long. I will drill holes through the tubes and insert a dowel to make the joints at shoulders, hips and knees. I will use a Styrofoam head and probably Styrofoam sculpted for the hands. Since it's now a zombie, regular clothing will be needed, and my son will be donating some old clothing and shoes.
The first thing I will do with the head is to carve out the eye sockets and around the mouth. I have shooter marbles for the eyes. I may be attaching a cord of some type to one eye and let it dangle, I haven't decided. I'll probably pick up some fake teeth for the mouth as well. Then I will be layering the head with liquid latex so the skin will look more real, and not like stryofoam. I can also create pockets of goo of some type and another layer of the latex to create boils. Further paint onto of the latex should provide the desired skin tone.
When I asked my son for donations of old clothes and shoes, he made two suggestions. The first was that there should be a sensor so when people walk by the zombie calls out for brains. The second thing was there needed to be coils of intestines spilling out of a gash. Personally, I know nothing of intestines, so off to research…
The human small intestines are grayish purple in color and are 1 1/2" diameter x 20 ft long on average. The large intestines are dark reddish, 3" diameter and 5 ft long. My first thought was sausage casings, but those that are artificial and don't require refrigeration, are expensive and cut to short lengths, maybe 20 inches at most. Right now I'm leaning toward the plastic sheeting that you put over a table cloth to keep it clean. There are various thicknesses available at most fabric stores. It comes clear, but I think spray painting on the inside of the plastic should take care of that.
My plan is something along the lines of cutting the plastic to width, and length (or piece to get length) , spray paint color, let dry. Roll and hot glue the long seam of the plastic around a dowel or other object, scrunch as I go. Seal one end before adding sand to tubes, though how much sand to add? I'm thinking less than a third full, so it's not weighted down, but enough that there is weight to it. I'll have to make a stomach I guess, and I'll probably be able to use a standard skeleton for the ribs, just have to watch for when the Halloween stuff shows up so I can get to it. I can attach the stomach to the ribs or the central tube, with one end of the small intestines attached to that. Then I can fasten the other end to a lower spot on the central tube (coil the small intestines into place to figure out where) and at this point glue in the large intestines, coil and fasten the other end to the tail of the center tube. I wonder if I can use a layer of the plastic as skin to create the outside of the body, something that is easily punctured, but sturdy enough to survive a year or two in storage.
Well, that's the plan so far. I'll post the sketch of the skeleton of tubes tomorrow, that's at work and not with me now.
Sunday, March 20, 2011
Hello world

Last Halloween I decided I didn't want to deal with all the trick or treaters ringing the doorbell, having to adjust the sensor light and the dogs going crazy every time the bell rings. My solution was to set up a pavilion in the front yard, decorate it and enjoy the evening outside. I starting looking for additional ideas on the decorations and found a whole new world of Haunts. I had so much fun planning and putting on my first haunt I decided I have to do it again, because there are so many other things I want to make.
 This is Hate and...
Discontent, my first attempts at papermache, making these gargoyles.
I'm not particularly happy with the finish and there are loads of details they need. I have researched and determined there is a paperclay product that I can put over the surface that will enhance these guys.

This is my ghost, just a couple of projects that I put together in the about two weeks between when I decided to do it and Halloween.
For this year, I'm developing the theme I had started of a mystic's shop, selling wands, charms and potions, that you have to walk through a graveyard to get to. I have a few of these things and will be making more. I will be getting a full book shelf decorated and full of colorful bottles with potions and other ingredients, like "eye of newt" and other such items from Macbeth witches. That's also where the title here comes from, as the original play calls them "weyward sisters", not witches. I also have plans for a stack of books that will be labeled for various things. I have a bookshelf full of old texts from college that haven't been openned in nearly that long, so I've purchased vinyl to cover the texts, I have gold paint to put the labels on the books.
I also have the makings of a zombie, full size, and plans for a giant spider, with victim and web and also new tomb stones. Oh yes, I also need some better lights for the path from the street down to the shop. I have some clay that I can make latterns.
Yeah, I have lots of plans swirling around my head, so here is my attempt to sort it all out and keep track of the things I'm doing, what I need to get done and how I actually do it.
Subscribe to:
Comments (Atom)